 Fare il veterinario con il tuo cane?
 Hai mai visto un cane ferito in una rissa o investito da un'auto? Forse potresti solo scuotere la testa e andartene. Non perché non ti importasse, ma perché non sapevi come avvicinarti ed esaminare il cane o cosa fare dopo. Soprattutto se hai un cane tutto tuo, vorrai essere preparato, perché il tuo cane dipende da te per l'aiuto in una situazione di emergenza.
Questo articolo ti fornirà le informazioni e le tecniche di cui avrai bisogno per somministrare con sicurezza il primo soccorso e forse salvare la vita di un animale domestico. Dalla somministrazione della RCP al trattamento di una puntura di insetto, imparerai come affrontare un'ampia gamma di emergenze canine.
Iniziamo imparando a trattenere correttamente un cane ferito e spaventato, poiché questo sarà il primo ordine del giorno per curare la maggior parte delle lesioni del cane.
Un cane ferito è solitamente spaventato e dolorante e, a meno che non si senta molto sicuro della tua presenza, potrebbe tentare di scappare o addirittura morderti. Pertanto, è importante utilizzare i seguenti suggerimenti quando ci si avvicina a un cane ferito.
Passaggio 1: Avvicinati lentamente al cane, parlando con un tono di voce rassicurante.
Passaggio 2: Avvicinati al cane senza toccarlo.
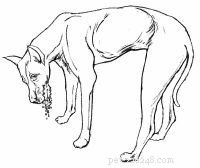
Fase 3: Abbassati verso il cane. Mentre continui a parlare, osserva i suoi occhi e l'espressione facciale.
Fase 3a: Se il cane ha gli occhi spalancati e ringhia, NON tentare di accarezzarlo. Procedi al passaggio 4.
Fase 3b: Se il cane sta tremando, con la testa china e un aspetto "sorridente" alla bocca, accarezzalo per rassicurarlo, prima sotto la mascella. Se questo è consentito, accarezza il cane sulla testa.
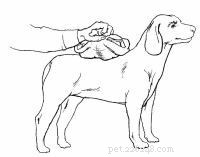
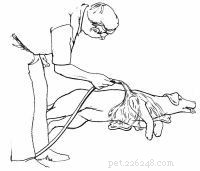
Fase 4: Fai scivolare un guinzaglio intorno al collo del cane. Usa qualsiasi materiale disponibile:una corda, una cravatta, una cintura o stracci strappati.
Passaggio 5: Se sei solo, posiziona il guinzaglio attorno a un oggetto fisso, come un palo di recinzione. Tira il cane contro questo oggetto e lega il guinzaglio in modo che il cane non possa muovere la testa.
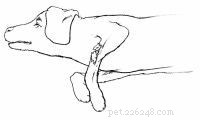
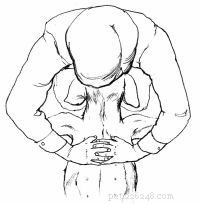
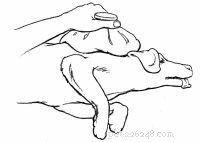
Passaggio 6: Metti la museruola al cane per proteggerti.
Fase 6a: Usando un lungo pezzo di corda, stracci strappati o una cravatta, avvolgi il muso del cane e fai un singolo nodo sotto il mento.
Fase 6b: Porta le estremità della corda, degli stracci o della cravatta dietro le orecchie e legala a fiocco.
Passaggio 7: Se sei solo, procedi alla somministrazione del trattamento.
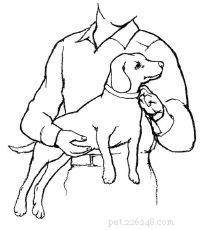
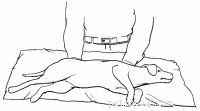
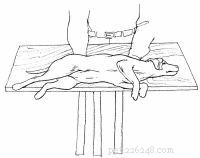
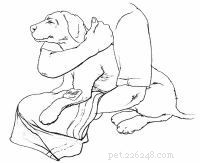
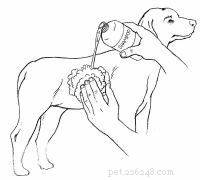
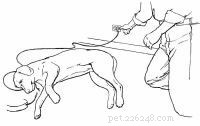
Passaggio 8: Se possibile, posiziona il cane su un tavolo o un'altra superficie rialzata.
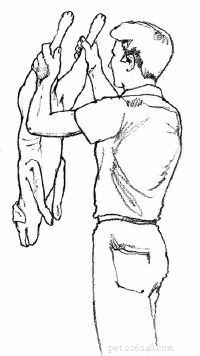
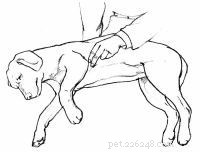
Fase 8a: Se il cane è piccolo, afferragli il collare con una mano e metti l'altro braccio sulla sua schiena e attorno al suo corpo. Allo stesso tempo, tira in avanti il collare e solleva il corpo del cane, cullandolo contro il tuo corpo.
Fase 8b: Se il cane è grande, infilagli un braccio sotto il collo, tenendogli la gola nell'incavo del tuo braccio. Assicurati che il cane possa respirare facilmente. Metti l'altro braccio sotto lo stomaco del cane. Sollevare con entrambe le braccia.
Fase 8c: Se il cane è molto grande, infilagli un braccio sotto il collo, tenendo il petto nell'incavo del tuo braccio. Assicurati che il cane possa respirare facilmente. Metti l'altro braccio sotto la groppa del cane e, premendo le braccia l'una verso l'altra, solleva il cane.
Fase 8d: Chiedi al tuo assistente di somministrare il trattamento mentre tieni il cane sul tavolo.
Fase 9: Se vuoi il cane dalla sua parte:
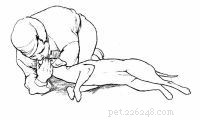
Fase 9a: Stai in piedi o inginocchiati in modo che il cane sia di fronte a te con la testa alla tua destra.
Fase 9b: Allungati sulla schiena del cane e afferra la gamba anteriore più vicina a te con la mano destra e la gamba posteriore più vicina a te con la mano sinistra.
Fase 9c: Allontana le gambe del cane da te e fai scivolare il cane lungo il tuo corpo.
Fase 9d: Afferra entrambe le gambe anteriori con la mano destra ed entrambe le gambe posteriori con la mano sinistra.
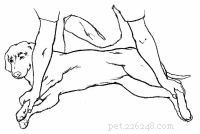
Fase 9e: Tieni il collo del cane verso il basso delicatamente con il braccio destro.
Fase 9f: Chiedi al tuo assistente di somministrare il trattamento.
Passaggio 10: Se vuoi il dog sitter:
Passaggio 10a: Fai scivolare un braccio sotto il collo del cane, tenendogli la gola nell'incavo del tuo braccio. Assicurati che il cane possa respirare facilmente.
Passaggio 10b: Metti l'altro braccio sulla schiena del cane e intorno al suo stomaco.
Fase 10c: Premendo il cane contro il tuo corpo, applica il peso del corpo ai quarti posteriori del cane.
Passaggio 10d: Chiedi al tuo assistente di somministrare il trattamento.
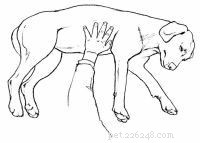
Passaggio 11: Se vuoi che il cane stia in piedi:
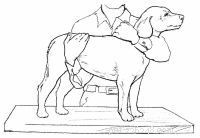
Fase 11a: Fai scivolare un braccio sotto il collo del cane, tenendogli la gola nell'incavo del tuo braccio. Assicurati che il cane possa respirare facilmente.
Passaggio 11b: Metti l'altro braccio sotto lo stomaco del cane.
Passaggio 11c: Premi il cane verso il tuo corpo e sollevalo verso l'alto.
Fase 11d: Chiedi al tuo assistente di somministrare il trattamento.
Imparare a trattenere un cane ti aiuterà in quasi tutte le situazioni di emergenza per animali domestici. Ora diamo un'occhiata a come trasportare quel cane ferito dal veterinario.
Elementi essenziali del kit di pronto soccorsoI proprietari di animali domestici dovrebbero avere a portata di mano i seguenti articoli per le emergenze dei cani.
Leggi di più
Dopo aver trattenuto il cane ferito, ti consigliamo di portarlo da un veterinario il prima possibile. Cerca di non spostare un cane ferito più del necessario e chiedi a qualcuno di chiamare il veterinario per essere certo che sia preparato per il tuo arrivo. Nel frattempo, usa i seguenti suggerimenti per aiutarti a trasportare il tuo animale domestico con la massima cura.
Passaggio 1: Se il cane è piccolo:
Fase 1a: Afferra il suo colletto con una mano e metti l'altro braccio sulla sua schiena e attorno al suo corpo.
Fase 1b: Allo stesso tempo, tira in avanti il collare e solleva il corpo del cane, cullandolo contro il tuo corpo.
Passaggio 2: Se il cane è grande:
Fase 2a: Fai scivolare un braccio sotto il suo collo, tenendogli la gola nell'incavo del tuo braccio. Assicurati che il cane possa respirare facilmente.
Fase 2b: Metti l'altro braccio sotto lo stomaco del cane. Sollevare con entrambe le braccia.
Fase 3: Se il cane è molto grande, infilagli un braccio sotto il collo, tenendo il petto nell'incavo del tuo braccio. Assicurati che il cane possa respirare facilmente. Metti l'altro braccio sotto la groppa del cane e, premendo le braccia l'una verso l'altra, solleva il cane.
Fase 4: Trasportare il cane dal veterinario.
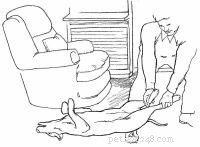
Se si sospetta una rottura della schiena, è necessario utilizzare una tavola piatta.
Passaggio 1: Usa una coperta o una tavola piatta come barella. Se stai usando una tavola, procedi al passaggio 2. Se stai usando una coperta:
Fase 1a: Metti una mano sotto il petto del cane e l'altra sotto il suo dorso; sollevare o far scivolare con cautela il cane sulla coperta.
Fase 1b: Trasportare il cane dal veterinario.
Passaggio 2: Se stai usando una tavola piatta:
Fase 2a: A seconda delle dimensioni del cane, usa una foglia da tavolo, un asse da stiro, un tagliere grande o una libreria rimovibile. Assicurati che tutto ciò che usi si adatti alla tua auto.
Fase 2b: Posiziona 2 o 3 lunghe strisce di stoffa o corda equidistanti sotto la tavola, evitando la zona in cui riposerà il collo del cane.
Fase 2c: Metti una mano sotto il petto del cane e l'altra sotto il suo dorso; sollevare o far scivolare con cautela il cane sulla tavola.
Fase 2d: Lega il cane alla tavola.
Fase 2e: Trasportare il cane dal veterinario.
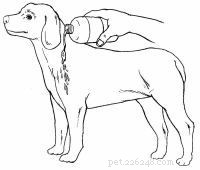
Un'altra tecnica che può tornare utile in molte situazioni di pronto soccorso è somministrare farmaci per via orale al tuo animale domestico. Consulta la pagina successiva per alcuni suggerimenti utili sulla somministrazione dei farmaci.
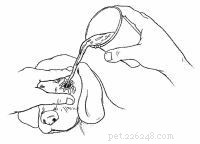
Se hai bisogno di somministrare antidolorifici dopo un grave infortunio o è solo l'ora della pillola mensile per la filariosi cardiopolmonare del tuo animale domestico, imparare a somministrare facilmente farmaci per via orale a un cane è un trucco utile da sapere. Usa i seguenti suggerimenti per aiutarti a somministrare al tuo cane farmaci liquidi o in pillole.
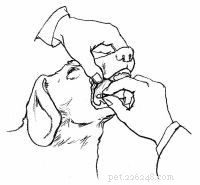
Passaggio 1: Trattieni il cane. Se il cane è difficile da gestire, potresti aver bisogno di aiuto per trattenerlo.
Fase 1a: Allevia l'apprensione del cane parlando a bassa voce e in modo rassicurante.
Fase 1b: Fai scivolare un braccio sotto il collo del cane, tenendogli delicatamente la gola nell'incavo del tuo braccio. Assicurati che il cane possa respirare facilmente.
Fase 1c: Passa l'altro braccio sopra o sotto il centro del cane, esercitando una pressione delicata ma decisa per tenere il suo corpo contro il tuo.
Fase 1d: Se necessario, applica un laccio morbido in modo che ci sia solo un leggero movimento della mascella.
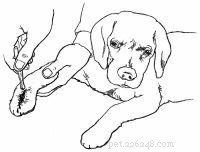
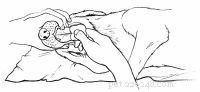
Passaggio 2: Inclina delicatamente la testa del cane leggermente all'indietro.
Fase 3: Tira fuori il labbro inferiore del cane all'angolo per creare un marsupio.
Fase 4: Usando un contagocce di plastica o una siringa dosatrice, metti il liquido un po' alla volta nella busta, facendo ingerire ogni piccola quantità prima di somministrare un'altra dose.
Passaggio 5: Strofina delicatamente la gola del cane per stimolare la deglutizione.
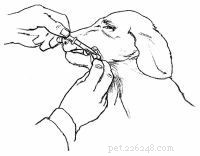
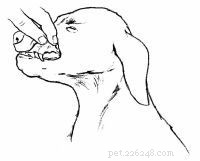
Passaggio 1: Trattieni il cane. Se il cane è difficile da gestire, potresti aver bisogno di aiuto per trattenerlo.
Fase 1a: Allevia l'apprensione del cane parlando a bassa voce e in modo rassicurante.
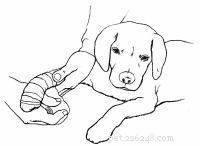
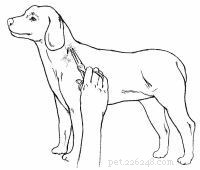
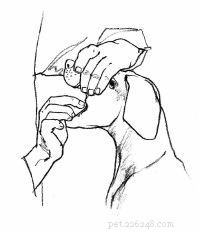
Passaggio 2: Afferra la mascella superiore del cane con una mano sul muso.
Fase 3: Premi le labbra del cane sui denti superiori premendo il pollice da un lato e le dita dall'altro in modo che le labbra del cane siano tra i denti e le dita. Applica una pressione decisa per forzare l'apertura della bocca.
Fase 4: Tieni la pillola tra il pollice e l'indice dell'altra mano e posiziona la pillola il più indietro possibile nella bocca del cane.
Passaggio 5: Strofina delicatamente la gola del cane per stimolare la deglutizione.
Un metodo alternativo è nascondere la pillola nel formaggio, nel burro di arachidi o in altre delizie squisite.
Il sangue su un cane può essere un segno di una ferita grave o solo un leggero graffio alla zampa. Nella prossima sezione, discuteremo come individuare i vari segni e cosa fare per aiutare un animale sanguinante.
Le zampe e le gambe di un cane sono vulnerabili alle lesioni dovute a vetri rotti, chiodi e altri oggetti appuntiti e sanguineranno molto quando vengono tagliati. Anche un orecchio ferito sanguinerà molto perché la pelle sopra l'orecchio è così sottile.
Con qualsiasi lesione emorragica, lo scopo principale del pronto soccorso è prevenire un'eccessiva perdita di sangue, che può portare a shock. I segni di shock includono gengive pallide o bianche, battito cardiaco accelerato o respiro rapido. Se da una ferita fuoriesce sangue, significa che un'arteria è stata tagliata. Ciò richiede un'attenzione professionale immediata.
Il modo in cui ti prendi cura del tuo cane dipenderà dalla posizione e dall'entità dell'emorragia. I seguenti suggerimenti per la cura del cane ti aiuteranno ad applicare il primo soccorso a varie aree del corpo.
Passaggio 1: Trattieni il cane se necessario.
Fase 1a: Avvicinati lentamente al cane, parlando con un tono di voce rassicurante.
Fase 1b: Fai scivolare un guinzaglio attorno al collo del cane, quindi posizionalo attorno a un oggetto fisso. Tira il cane contro questo oggetto e lega il guinzaglio in modo che il cane non possa muovere la testa.
Fase 1c: Metti la museruola al cane per proteggerti.
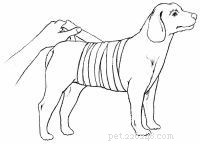
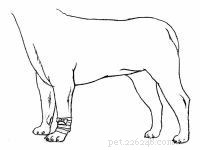
Passaggio 2: Coprire la ferita con una garza sterile, un asciugamano pulito piegato o un assorbente igienico.
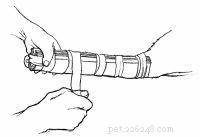
Fase 3: Avvolgi stracci strappati o altro materiale morbido attorno alla medicazione e legalo o fissalo con nastro adesivo quanto basta per tenere la benda in posizione.
Fase 4: Trasportare immediatamente il cane dal veterinario.
Passaggio 1: Trattieni il cane se necessario.
Fase 1a: Avvicinati lentamente al cane, parlando con un tono di voce rassicurante.
Passaggio 2: Taglia i capelli intorno all'area lesa.
Fase 3: Esaminare la ferita alla ricerca di vetro o altri oggetti estranei. Se visibile, rimuovere l'oggetto con le dita o un paio di pinzette. Se il tessuto sotto la ferita sembra passare quando muovi la pelle, la ferita richiederà probabilmente dei punti di sutura.
Fase 4: Sciacquare accuratamente la ferita con acqua pulita. Evita gli antisettici domestici, che possono causare dolore quando applicati.
Passaggio 5: Coprire la ferita con un panno pulito, una medicazione sterile o un assorbente igienico.
Passaggio 6: Metti la mano sulla medicazione e premi con decisione.
Passaggio 7: Mantieni la pressione sulla medicazione per fermare l'emorragia. Se il sangue penetra attraverso la medicazione, NON rimuoverla. Applicare più medicazione e continuare ad applicare pressione fino a quando l'emorragia si interrompe. Se l'emorragia non si ferma entro 5 minuti, continua ad esercitare pressione sulla ferita mentre trasporti il cane dal veterinario.
Passaggio 8: Avvolgi stracci strappati o altro materiale morbido attorno alla medicazione e legalo o fissalo con nastro adesivo quanto basta per mantenere la benda. Inizia sotto la ferita e avvolgi verso l'alto.
Fase 9: Se la ferita è abbastanza profonda da richiedere punti di sutura, tieni il cane lontano dalla gamba ferita e trasporta immediatamente il tuo animale dal veterinario.
Passaggio 1: Trattieni il cane se necessario.
Fase 1a: Avvicinati lentamente al cane, parlando con un tono di voce rassicurante.
Fase 1b: Metti la museruola al cane per proteggerti.
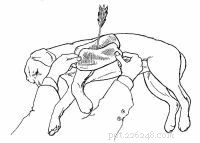
Passaggio 2: Se la ferita è nel torace e si sente un rumore di "suzione", fasciare la ferita abbastanza strettamente da impedire all'aria di entrare e trasportare immediatamente il cane dal veterinario. In caso contrario, vai al passaggio 3.
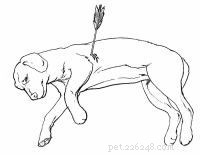
Fase 3: Se è presente un oggetto sporgente, come una freccia, NON tentare di rimuovere l'oggetto. In caso contrario, vai al passaggio 4.
Fase 3a: Posizionare panni puliti, medicazioni sterili o assorbenti igienici intorno al punto di ingresso.
Fase 3b: Benda strettamente attorno al punto di ingresso.
Fase 3c: Trasportare immediatamente il cane dal veterinario.
Fase 4: Taglia i capelli intorno all'area lesa.
Passaggio 5: Esaminare la ferita alla ricerca di vetro o altri oggetti estranei. Se visibile, rimuovere l'oggetto con le dita o un paio di pinzette. Se il tessuto sotto la ferita sembra passare quando muovi la pelle, la ferita richiederà probabilmente dei punti di sutura.
Passaggio 6: Sciacquare accuratamente la ferita con acqua pulita.
Passaggio 7: Coprire la ferita con un panno pulito, una medicazione sterile o un assorbente igienico.
Passaggio 8: Metti la mano sulla medicazione e premi con decisione.
Fase 9: Mantenere la pressione sulla medicazione per fermare l'emorragia. Se il sangue penetra attraverso la medicazione, NON rimuoverla. Applicare più medicazione e continuare ad applicare pressione fino a quando l'emorragia si interrompe.
Passaggio 10: Avvolgi fogli strappati o altro materiale morbido attorno alla fasciatura e legalo o fissalo con nastro adesivo quanto basta per mantenere la benda.
Passaggio 11: Se la ferita è abbastanza profonda da richiedere punti di sutura, trasporta immediatamente il cane dal veterinario.
Passaggio 1: Trattieni il cane se necessario.
Fase 1a: Avvicinati lentamente al cane, parlando con un tono di voce rassicurante.
Fase 1b: Metti la museruola al cane per proteggerti.
Passaggio 2: Copri la ferita con un panno pulito, una medicazione sterile o un assorbente. Posiziona il materiale per la medicazione su entrambi i lati del paraorecchie, quindi piegalo sopra la parte superiore della testa del cane e tienilo saldamente per controllare l'emorragia.
Fase 3: Avvolgi fogli o stracci strappati attorno alla medicazione, all'orecchio e alla testa, assicurandoti che l'intero orecchio sia coperto. Fissare con nastro adesivo o legare la benda.
Fase 4: Trasportare immediatamente il cane dal veterinario.
Un'unghia rotta o tagliata troppo corta sono i motivi più comuni per un'unghia sanguinante. Assicurati di portare il tuo cane dal toelettatore se non ti senti a tuo agio a tagliargli le unghie.
Se l'unghia è rotta:
Passaggio 1: Trattieni il cane se necessario.
Fase 1a: Avvicinati lentamente al cane, parlando con un tono di voce rassicurante.
Passaggio 2: NON cercare di tagliare o rimuovere l'unghia rotta senza mettere la museruola al cane.
Fase 3: Tieni un panno pulito, una medicazione sterile o un assorbente contro l'unghia. L'emorragia si fermerà in pochi minuti.
Fase 4: Trasportare il cane dal veterinario il prima possibile.
Se l'unghia è tagliata troppo corta:
Passaggio 1: Trattieni il cane se necessario.
Fase 1a: Avvicinati lentamente al cane, parlando con un tono di voce rassicurante.
Fase 1b: Fai scivolare un guinzaglio attorno al collo del cane, quindi posizionalo attorno a un oggetto fisso. Tira il cane contro questo oggetto e lega il guinzaglio in modo che il cane non possa muovere la testa.
Fase 1c: Metti la museruola al cane per proteggerti.
Passaggio 2: Tieni un panno pulito, una medicazione sterile o un assorbente contro l'unghia.
Fase 3: Mantenere una pressione decisa sull'area per almeno 5 minuti. NON rimuovere il bendaggio fino a quando l'emorragia non si ferma.
Fase 4: Se l'emorragia non si ferma in 15-20 minuti, trasportare il cane dal veterinario il prima possibile. Il sanguinamento continuo indica un disturbo emorragico che dovrebbe essere trattato tempestivamente.
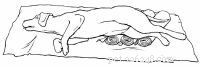
L'emorragia interna è sempre un'emergenza. I segni di emorragia interna sono gengive pallide o bianche; battito cardiaco accelerato o respirazione; e sanguinamento dalle orecchie, dal naso, dalla bocca o dal retto. I seguenti passaggi ti aiuteranno a curare il cane per qualsiasi potenziale shock e a trasportare immediatamente il cane in un aiuto professionale.
Passaggio 1: Se c'è sanguinamento da ferite esterne, trattalo per lo shock.
Fase 1a: Esamina le gengive sollevando delicatamente il labbro superiore in modo che la gengiva sia visibile. Gengive pallide o bianche indicano che il cane è quasi certamente sotto shock e potrebbe avere gravi lesioni interne e/o sanguinamento. Se le gengive sono rosa, il cane probabilmente non è sotto shock.
Fase 1b: Determina il battito cardiaco. Metti le dita saldamente sul cane a circa 2 pollici dietro il gomito del cane al centro del suo petto. Conta il numero di battiti in 10 secondi e moltiplicalo per 6. Se il cane è sotto shock, il suo battito cardiaco può superare i 150 battiti al minuto.
Passaggio 2: Metti il cane su un fianco con la testa tesa.
Fase 3: Estrarre delicatamente la lingua del cane per mantenere aperte le vie aeree.
Fase 4: Solleva leggermente i quarti posteriori del cane posizionandoli su un cuscino o su asciugamani piegati.
Passaggio 5: Per conservare il calore corporeo, avvolgi il cane in una coperta o in una giacca.
Passaggio 6: Trasportare immediatamente il cane dal veterinario.
Il gonfiore è una condizione grave che può causare la morte improvvisa di un cane. Nella prossima sezione, discuteremo i segni del gonfiore e cosa fare se sospetti che il tuo animale domestico ne soffra.
È difficile accettare il fatto che un cane apparentemente sano possa, nel giro di un'ora, combattere per la propria vita. Il gonfiore è una condizione estremamente grave, potenzialmente fatale. Il trattamento professionale è urgente e non dovrebbe essere ritardato.
Il gonfiore sembra colpire i cani di grossa taglia e dal petto profondo più di altre razze. I sintomi sono drammatici e inconfondibili e includono sbavare, ritmo e agitazione eccessivi; un addome ingrossato; e frequenti tentativi di vomito, che producono grandi quantità di schiuma bianca o niente del tutto.
Non esiste una spiegazione scientifica soddisfacente sul motivo per cui si verifica il gonfiore. Fondamentalmente, lo stomaco si riempie di gas, come un pallone gonfiato. Ma con il palloncino c'è spazio per l'espansione. Con lo stomaco non ce n'è, quindi il gas esercita pressione sulla milza, sul fegato e su altri organi interni.
Se sospetti che il tuo animale domestico soffra di gonfiore, portalo immediatamente dal veterinario. Il gonfiore è spesso seguito da torsione gastrica (girare lo stomaco), che porta a shock e morte nel giro di poche ore.
Per prevenire il rigonfiamento e la conseguente torsione, dai da mangiare al cane pasti piccoli più volte al giorno anziché un pasto abbondante e assicurati di evitare esercizi pesanti dopo i pasti.
Consulta la sezione successiva per consigli su cosa fare se il tuo animale domestico ha una gamba rotta, incluso come attaccare una stecca.
Con i cani, come con gli esseri umani, tutte le ossa sono soggette a rotture, ma le fratture alle gambe sono di gran lunga le più comuni. È importante ricordare che i cani hanno un'elevata tolleranza al dolore e spesso una gamba penzolante sembra non causare dolore. Pertanto, non aver paura di maneggiare l'arto fratturato (ma sii gentile!). Il cane ti farà sapere se fa male.
Alcuni segni da cercare includono una gamba che sembra deforme, pende molle, non può sostenere il peso corporeo ed è gonfia. Fai attenzione anche ai segni di shock, che includono gengive pallide o bianche, battito cardiaco accelerato o respiro rapido.
Per fornire una cura adeguata all'osso rotto del tuo cane, usa i seguenti suggerimenti.
Passaggio 1: Trattieni il cane se necessario.
Fase 1a: Avvicinati lentamente al cane, parlando con un tono di voce rassicurante.
Fase 1b: Fai scivolare un guinzaglio attorno al collo del cane, quindi posizionalo attorno a un oggetto fisso. Tira il cane contro questo oggetto e lega il guinzaglio in modo che il cane non possa muovere la testa.
Fase 1c: Metti la museruola al cane per proteggerti.
Passaggio 2: Esaminare la gamba e determinare se la frattura è aperta (ferita vicino alla rottura o osso che sporge dalla pelle) o chiusa (nessuna rottura nella pelle).
Fase 3: Se la frattura è chiusa, procedere al passaggio 4. Se la frattura è aperta:
Fase 3a: Sciacquare accuratamente la ferita con acqua pulita.
Fase 3b: Coprire la ferita con una benda sterile, un panno pulito o un assorbente igienico.
Fase 3c: NON tentare di splintare la frattura. Tenere un grande asciugamano piegato sotto l'arto non steccato e trasportare immediatamente il cane dal veterinario.
Fase 4: Se l'arto rotto è gravemente deforme o il cane sembra soffrire molto quando tenti di steccare, fermati e procedi al passaggio 5. Altrimenti, procedi con la steccatura dell'osso.
Fase 4a: Usa qualsiasi materiale per stecche disponibile:bastoncini, giornali, riviste o cartone rigido. L'obiettivo è immobilizzare l'arto, non ripristinarlo.
Fase 4b: Fissare le stecche alla gamba fratturata con strisce di stoffa o garze strappate.
Fase 4c: Fissare o legare le strisce saldamente ma non così strettamente da compromettere la circolazione.
Fase 4d: Trasportare immediatamente il cane dal veterinario.
Passaggio 5: Se l'arto rotto è gravemente deforme o il cane sembra soffrire molto quando tenti di steccare, tieni un grande asciugamano sotto l'arto non steccato per sostenerti e trasporta immediatamente il cane dal veterinario.
Preparati alle ustioni del tuo animale domestico controllando i suggerimenti nella sezione successiva.
I cani adorano stare sotto i piedi mentre i loro proprietari cucinano. Anche se questo può essere un tratto ammirevole del migliore amico dell'uomo, può anche essere pericoloso quando in cucina si usa acqua bollente o olio da cucina caldo.
Un cane può sperimentare ustioni di primo, secondo o terzo grado causate da fuoco, calore, liquidi bollenti, sostanze chimiche ed elettricità. Tutti sono dolorosi e possono causare danni, persino la morte. Le ustioni superficiali, evidenziate da dolore e arrossamento della pelle, di solito non sono gravi. Tuttavia, il primo soccorso dovrebbe essere prestato il prima possibile per alleviare il dolore.
I seguenti suggerimenti ti aiuteranno non solo a identificare il tipo di ustione con cui hai a che fare, ma ti daranno anche suggerimenti su come trattare al meglio la lesione.
I segni di un'ustione di primo grado includono pelo intatto o bruciacchiato, lesioni dolorose o pelle arrossata con possibili vesciche. I segni di un'ustione di secondo grado sono il pelo bruciacchiato o lesioni dolorose che assumono un colore marrone chiaro con gonfiore e vesciche. Se noti uno di questi segnali di pericolo, ecco cosa fare:
Passaggio 1: Trattieni il cane se necessario.
Passaggio 2: Applicare acqua fredda o impacchi di ghiaccio sulla zona ustionata e lasciare a contatto con la pelle per 15 minuti. NON applicare unguenti o burro.
Fase 3: Se le ustioni coprono gran parte del corpo del cane o si trovano dove il cane può leccarle, coprire l'area con una medicazione sterile. NON usare cotone.
Fase 4: Avvolgi stracci strappati o altro materiale morbido attorno alla medicazione e legalo o fissalo con nastro adesivo quanto basta per tenerlo in posizione.
Passaggio 5: Trasportare il cane dal veterinario il prima possibile.
I segni di un'ustione di terzo grado includono la distruzione dell'intera area della pelle, lesioni nere o bianche o il pelo che si stacca facilmente. Presta attenzione anche ai segni di shock, che includono gengive pallide o bianche, battito cardiaco accelerato o respiro rapido. Se noti questi segnali, ecco cosa fare:
Passaggio 1: Trattieni il cane se necessario.
Fase 1a: Avvicinati lentamente al cane, parlando con un tono di voce rassicurante.
Passaggio 2: Esamina il cane per lo shock. Se non è sotto shock, vai al passaggio 3.
Fase 2a: Esamina le gengive sollevando delicatamente il labbro superiore in modo che la gengiva sia visibile. Le gengive pallide o bianche indicano che il cane è quasi certamente sotto shock. Se le gengive sono rosa, il cane probabilmente non è sotto shock.
Fase 2b: Determina il battito cardiaco. Metti le dita saldamente sul cane a circa 2 pollici dietro il gomito del cane al centro del suo petto. Conta il numero di battiti in 10 secondi e moltiplicalo per 6. Se il cane è sotto shock, il suo battito cardiaco può superare i 150 battiti al minuto.
Fase 2c: Metti il cane su un fianco con la testa estesa. Estrarre delicatamente la lingua del cane per mantenere aperte le vie aeree.
Fase 2d: Solleva leggermente i quarti posteriori del cane posizionandoli su un cuscino o asciugamani piegati. Per conservare il calore corporeo, avvolgi il cane in una coperta o in una giacca.
Fase 3: NON applicare unguenti o burro. Applicare una medicazione asciutta e pulita sull'area bruciata. NON usare cotone.
Fase 4: Avvolgi stracci strappati o altro materiale morbido attorno alla medicazione e legalo o fissalo con nastro adesivo quanto basta per tenerlo in posizione.
Passaggio 5: Trasportare il cane dal veterinario il prima possibile.
I segni di un'ustione chimica includono un odore chimico come trementina, benzina o insetticida; pelle arrossata; o dolore. Se noti questi segni, procedi come segue:
Passaggio 1: Trattieni il cane se necessario.
Fase 1a: Avvicinati lentamente al cane, parlando con un tono di voce rassicurante.
Passaggio 2: Lavare accuratamente l'area con acqua e sapone; ripetere tutte le volte necessarie per rimuovere la sostanza chimica. Usa sapone neutro e schiuma bene. NON utilizzare solventi di alcun tipo.
Fase 3: Chiama il veterinario per ulteriori istruzioni.
Il tuo cane entra in qualcosa e in tutto? Consulta la sezione successiva per suggerimenti di primo soccorso sul trattamento di un cane che sta soffocando, incluso come liberare le vie aeree e somministrare la RCP.
Quando un cane sta soffocando con un oggetto estraneo, ha bisogno di aiuto immediatamente. Più si cerca di respirare, più diventa panico. Il tuo obiettivo in questa situazione di emergenza è aprire le vie aeree del cane senza essere morso.
I segni che un cane sta soffocando includono scalpitare alla bocca, una lingua pallida o bluastra, evidente angoscia o perdita di coscienza. Se il cane è privo di sensi e si ritiene che sia presente un corpo estraneo, è necessario aprire le vie aeree prima di sottoporre il cane alla rianimazione cardiopolmonare (RCP). Se il cane non riesce a respirare, gli sforzi per rianimarlo saranno inutili.
Anche se tutto questo suona abbastanza opprimente, puoi aiutare un cane che sta soffocando o ha perso i sensi seguendo i suggerimenti di base descritti di seguito. I tuoi sforzi possono salvare la vita di un cane!
Passaggio 1: Trattieni il cane se necessario.
Fase 1a: Avvicinati lentamente al cane, parlando con un tono di voce rassicurante.
Passaggio 2: Libera le vie aeree.
Fase 2a: Apri con cautela la bocca del cane afferrando la mascella superiore con una mano sopra il muso.
Fase 2b: Premi le labbra del cane sui denti superiori premendo il pollice da un lato e le dita dall'altro in modo che le labbra siano tra i denti del cane e le dita. Applica una pressione decisa per forzare l'apertura della bocca.
Fase 2c: Se riesci a vedere l'oggetto, prova a rimuoverlo con le dita.
Fase 2d: Se non riesci a rimuovere l'oggetto e il cane è abbastanza piccolo, raccoglilo afferrandogli le zampe posteriori; capovolgerlo e agitare energicamente. Schiaffeggiarlo mentre si agita può aiutare a rimuovere l'oggetto.
Fase 2e: Se non riesci a rimuovere l'oggetto e il cane è troppo grande per essere sollevato, posiziona il cane su un lato sul pavimento. Metti la mano appena dietro la gabbia toracica e premi verso il basso e leggermente in avanti in modo rapido e deciso. Liberare. Ripetere rapidamente più volte fino a quando l'oggetto non viene espulso.
Fase 3: Se non riesci a rimuovere l'oggetto, trasporta immediatamente il cane dal veterinario.
Fase 4: Se sposti l'oggetto e il cane non respira, senti il battito del cuore mettendo le dita a circa 2 pollici dietro il gomito del cane al centro del suo petto.
Passaggio 5: Se il cuore del cane non batte, vai al passaggio 6. Se lo è, esegui la respirazione artificiale.
Fase 5a: Gira il cane su un fianco.
Fase 5b: Estendi la testa e il collo del cane. Tieni la bocca e le labbra del cane chiuse e soffia con decisione nelle sue narici. Somministrare 1 respiro ogni 3-5 secondi. Fai un respiro profondo e ripeti finché non senti resistenza o vedi il petto sollevarsi.
Fase 5c: Dopo 10 secondi, fermati. Watch the chest for movement to indicate the dog is breathing on its own.
Step 5d: If the dog is not breathing, continue artificial respiration.
Passaggio 6: If the heart is not beating, perform CPR.
Step 6a: Turn the dog on its back.
Step 6b: Kneel down at the head of the dog.
Step 6c: Clasp your hands over the dog's chest with your palms resting on either side of its chest.
Step 6d: Compress your palms on the chest firmly for a count of "2," and release for a count of "1." Moderate pressure is required. Repeat about 60 to 90 times per minute.
Step 6e: Alternately (after 30 seconds), hold the dog's mouth and lips closed and blow firmly into its nostrils. Blow for 3 seconds, take a deep breath, and repeat until you feel resistance or see the dog's chest rise. Try to repeat this 10 to 20 times per minute. As a general rule, use a CPR ratio of about 5 heart compressions to 1 breath of air.
Step 6f: After 1 minute, stop. Look at the chest for breathing movement, and feel for a heartbeat by placing fingers about 2 inches behind the dog's elbow in the center of its chest.
Step 6g: If the dog's heart is not beating, continue CPR. If the heart starts beating, but the dog is still not breathing, return to Step 5.
Step 6a: Turn the dog on its side.
Step 6b: Place the palm of your hand in the middle of the dog's chest.
Step 6c: Press for a count of "2," and release for a count of "1." Firm pressure is required. Repeat about 60 to 90 times per minute.
Step 6d: Alternately (after 30 seconds), hold the dog's mouth and lips closed and blow firmly into its nostrils. Blow for 3 seconds, take a deep breath, and repeat until you feel resistance or see the chest rise. Try to repeat this 10 to 20 times per minute.
Step 6e: After 1 minute, stop. Look at the chest for breathing movement, and feel for a heartbeat by placing your fingers about 2 inches behind the dog's elbow in the center of its chest.
Step 6f: If the dog's heart is not beating, continue CPR. If the heart starts beating but the dog is still not breathing, return to Step 5.
Passaggio 7: Transport the dog immediately to the veterinarian. CPR or artificial respiration should be continued on the way to the veterinarian or until dog is breathing and its heart is beating without assistance.
Witnessing a seizure can be a scary thing, but don't panic. Use the tips on the next page to help you if your pet experiences convulsions or seizures.
A convulsion or seizure is the result of constant electrical firing of the muscles of the body from the brain. Convulsions are rarely fatal, and most last only a few minutes. A typical seizure is then followed by 15 minutes to a half hour of recovery time, during which period the dog may be dazed and confused.
Not all seizures are due to epilepsy. Some are caused by lead or other poisons, liver diseases, and even brain tumors. Seizures or convulsions should never be taken lightly. The problem should be discussed with your veterinarian as soon as possible.
The most important thing to do if your dog is experiencing a seizure is to protect it from self-injury. Be patient, don't panic, and use the following tips to provide proper care.
Passaggio 1: DO NOT place your fingers or any object in the dog's mouth.
Passaggio 2: Pull the dog away from walls and furniture to prevent self-injury.
Fase 3: Seizures can raise your dog's body temperature fast, so don't wrap the dog in a blanket or towel for comfort until the seizure is over. Instead, place cool washcloths on his feet to help keep his temperature from rising.
Fase 4: After the seizure has stopped, contact your veterinarian for further instructions. You can now wrap your dog in a towel or blanket to comfort him after the seizure he's alert.
Passaggio 5: If you're able to, time your dog's seizure. If it lasts less than 2 minutes, he should be OK but you should still consult with your veterinarian. If it lasts between 2 and 5 minutes, this is starting to hit the warning zone and you dog should take your dog to the vet as soon as possible. If the seizure lasts longer than 5 minutes, he needs to be treated by your veterinarian immediately.
A common ailment among most pets, diarrhea can become a serious problem if not treated properly. Turn to the next section for helpful tips.
Diarrhea is a commonly encountered problem that occurs when food is passed through a dog's intestine too rapidly. It can be caused by allergies, milk, parasites, spoiled food, or bacterial infection. There are also more serious causes such as tumors; viral infections; and diseases of the liver, pancreas, and kidney.
Be sure to seek professional help if blood, severe depression, or abdominal pain are present in your pet. Otherwise, use the following suggestions to help ease a dog's discomfort.
Passaggio 1: Remove all food for 12 to 24 hours. Water is important to prevent dehydration in severe diarrhea. It should not be removed.
Passaggio 2: If blood appears or if diarrhea continues for more than 24 hours, contact the veterinarian. He or she will probably want to see a stool sample.
Fase 3: After at least 12 hours, treat the dog by feeding it a bland diet such as boiled skinless chicken and rice (50:50 mixture). When stools begin to form, slowly phase back to regular diet. Kaopectate or Pepto-Bismol can be safely used in dogs. Call your veterinarian for the correct dosage for your pet.
When people think of animal bites, they usually think of a human being bit by a dog. But dogs can also be the victims of bites from dogs or other animals lurking in the backyard. Check the next section for first-aid tips when your dog experiences an animal bite.
When a dog gets into a fight with another dog, a cat, or a wild animal, damage can occur to both the skin and the underlying tissue. Many dogfights can be avoided by not permitting your dog to run loose and by keeping it on a leash when you walk it. The dog should also be trained to obey your commands.
If your dog does get into a fight, do not try to break it up with your bare hands. A fighting dog will bite anything in its way, including you. Pull your leashed dog out of harm's way or use a long stick. After the fight is over, examine your dog carefully for hidden wounds. You'll often find punctures around the neck area and on the legs. Look through the hair carefully to find bloodstains, which would indicate the skin has been punctured.
It is important to determine if the biting animal has been inoculated against rabies. If the biter is a wild animal such as a skunk or raccoon, efforts should be made to destroy it so the brain can be examined for rabies. Never touch the wild animal with your bare hands, even after it has been killed. Wear gloves or wrap the body in a blanket. Your veterinarian will take care of the rabies examination.
To provide proper care to a dog suffering from an animal bite, use the following tips.
Passaggio 1: Restrain the dog if necessary.
Fase 1a: Approach the dog slowly, speaking in a reassuring tone of voice.
Fase 1b: Slip a leash around the dog's neck, then place the leash around a fixed object. Pull the dog against this object and tie the leash so the dog cannot move its head.
Fase 1c: Muzzle the dog to protect yourself.
Passaggio 2: Clip the hair around the wound.
Fase 3: Flush the wound thoroughly with clean water. Avoid home antiseptics, which may cause pain when applied.
Fase 4: Examine the wound. If the tissue under the wound appears to pass by when you move the skin, the wound will probably require stitches.
Passaggio 5: DO NOT bandage. Allow the wound to drain unless there is excessive bleeding. If the wound does bleed excessively, follow these steps:
Step 5a: Cover wound with clean cloth, sterile dressing, or sanitary napkin.
Step 5b: Place your hand over the dressing and press firmly.
Step 5c: Keep pressure on the dressing to stop the bleeding.
Step 5d: If blood soaks through the dressing, DO NOT remove it. Apply more dressing and continue to apply pressure until the bleeding stops.
Passaggio 6: If the wound is deep enough to require stitches, transport the dog immediately to the veterinarian.
Passaggio 7: Be sure to contact your veterinarian if your dog is not current on its rabies vaccination.
Dogs are natural swimmers, but situations can occur where a dog swims too far and starts drowning. Turn to the next section to find out how to best handle this type of emergency.
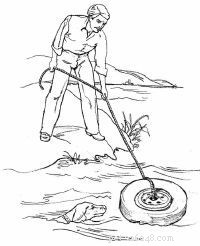
Dogs are naturally good swimmers for short distances, but they can get into trouble. Sometimes they get too far from the shore and tire trying to swim back, or they fall into a swimming pool and cannot get up the steep sides.
Always protect yourself when trying to rescue a drowning dog. An extra few moments of preparation can save two lives -- yours and the dog's. Also be sure to watch for signs of shock, which include pale or white gums, a rapid heartbeat, or rapid breathing. Use the following tips when rescuing a drowning dog.
Passaggio 1: Rescue the dog.
Fase 1a: Holding the attached rope, throw a life preserver toward the dog. OR
Fase 1b: Try to hook the dog's collar with a pole. OR
Fase 1c: Row out to the dog in a boat. OR
Fase 1d: As a last resort, swim to the dog. Protect yourself. Bring something for the dog to cling to or climb on and be pulled to shore.
Passaggio 2: Drain the dog's lungs.
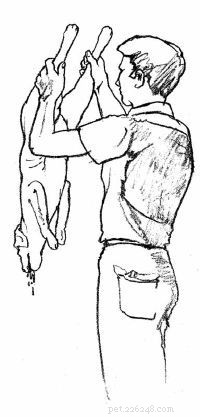
Step 2a: If you can lift the dog, grasp the rear legs and hold the animal upside down for 15 to 20 seconds. Give 3 or 4 downward shakes to help drain fluid from its lungs.
Step 2b: If you cannot lift the dog, place it on a sloping surface with its head low to facilitate drainage.
Fase 3: If the dog is not breathing, feel for a heartbeat by placing your fingers about 2 inches behind the dog's elbow in the middle of its chest.
Fase 4: If the heart is not beating, proceed to Step 5. If it is, perform artificial respiration.
Fase 4a: Turn the dog on its side.
Fase 4b: Extend the dog's head and neck. Hold the dog's mouth and lips closed and blow firmly into its nostrils. Administer 1 breath every 3 to 5 seconds. Take a deep breath, and repeat until you feel resistance or see the chest rise.
Fase 4c: After 10 seconds, stop. Watch the dog's chest for movement to indicate it is breathing on its own.
Fase 4d: If the dog is not breathing, continue artificial respiration.
Passaggio 5: Se il cuore non batte, eseguire la rianimazione cardiopolmonare (RCP).
Step 5a: Turn the dog on its back.
Step 5b: Kneel down at the head of the dog.
Step 5c: Clasp your hands over the dog's chest with your palms resting on either side of its chest.
Step 5d: Compress your palms on the chest firmly for a count of "2," and release for a count of "1." Moderate pressure is required. Repeat about 60 to 90 times per minute.
Step 5e: Alternately (after 30 seconds), hold the dog's mouth and lips closed and blow firmly into its nostrils. Blow for 3 seconds, take a deep breath, and repeat until you feel resistance or see the dog's chest rise. Try to repeat this 10 to 20 times per minute. As a general rule, use a CPR ratio of about 5 heart compressions to 1 breath of air.
Step 5f: After 1 minute, stop. Look at the chest for breathing movement, and feel for a heartbeat by placing fingers about 2 inches behind the dog's elbow in the center of its chest.
Step 5g: If the dog's heart is not beating, continue CPR. If the heart starts beating, but the dog is still not breathing, return to Step 4.
Step 5a: Turn the dog on its side.
Step 5b: Place the palm of your hand in the middle of the dog's chest.
Step 5c: Press for a count of "2," and release for a count of "1." Firm pressure is required. Repeat about 60 to 90 times per minute.
Step 5d: Alternately (after 30 seconds), hold the dog's mouth and lips closed and blow firmly into its nostrils. Blow for 3 seconds, take a deep breath, and repeat until you feel resistance or see the chest rise. Try to repeat this 10 to 20 times per minute.
Step 5e: After 1 minute, stop. Look at the chest for breathing movement, and feel for a heartbeat by placing your fingers about 2 inches behind the dog's elbow in the center of its chest.
Step 5f: If the dog's heart is not beating, continue CPR. If the heart starts beating but the dog is still not breathing, return to Step 4.
Passaggio 6: Transport the dog immediately to the veterinarian. CPR or artificial respiration should be continued until the dog is breathing and its heart is beating without assistance.
Puppies love to chew -- and they rarely discriminate between what they chew and what they avoid. If your puppy gets a hold of an electrical cord, you may be faced with treating electrical shock. Check the next section for tips on dealing with this type of pet emergency.
Grown dogs are seldom victims of electrical shock. But puppies are naturally curious and will chew almost anything, including electrical cords. If the insulation is punctured and the mouth comes in contact with both wires, the dog will receive a shock and may be unable to release the cord.
Electrocution can cause severe heart damage and fluid accumulation in the lungs. Strong shock can stop the heart, and CPR will need to be performed immediately to start the heart beating again. In addition, the dog's mouth will likely be burned from contact with the bare wires. Be sure to watch for signs of shock, which include pale or white gums, a rapid heartbeat, or rapid breathing.
To provide the proper care for your pet who is suffering from electrical shock, use the following tips.
Passaggio 1: If the dog still has the electrical cord in its mouth, DO NOT touch the dog. First remove the plug from its outlet.
Passaggio 2: If the dog is unconscious, check for breathing. If the dog is conscious and breathing, proceed to Step 6. If the dog is not breathing, feel for a heartbeat by placing your fingers about 2 inches behind the elbow in the middle of its chest.
Fase 3: If the heart is not beating, proceed to Step 4. If it is, perform artificial respiration.
Fase 3a: Turn the dog on its side, and extend its head and neck.

Fase 3b: Hold the dog's mouth and lips closed and blow firmly into its nostrils. Administer 1 breath every 3 to 5 seconds. Take a deep breath, and repeat until you feel resistance or see the chest rise.
Fase 3c: After 10 seconds, stop. Watch the dog's chest for movement to indicate the dog is breathing on its own.
Step 3d: If the dog is not breathing, continue artificial respiration.
Fase 4: If the heart is not beating, perform CPR.
Fase 4a: Turn the dog on its back.
Fase 4b: Kneel down at the head of the dog.
Fase 4c: Clasp your hands over the dog's chest with your palms resting on either side of its chest.
Fase 4d: Compress your palms on the chest firmly for a count of "2," and release for a count of "1." Moderate pressure is required. Repeat about 60 to 90 times per minute.
Fase 4e: Alternately (after 30 seconds), hold the dog's mouth and lips closed and blow firmly into its nostrils. Blow for 3 seconds, take a deep breath, and repeat until you feel resistance or see the dog's chest rise. Try to repeat this 10 to 20 times per minute. As a general rule, use a CPR ratio of about 5 heart compressions to 1 breath of air.
Fase 4f: After 1 minute, stop. Look at the chest for breathing movement, and feel for a heartbeat by placing fingers about 2 inches behind the dog's elbow in the center of its chest.
Fase 4g: If the dog's heart is not beating, continue CPR. If the heart starts beating, but the dog is still not breathing, return to Step 3.
Fase 4a: Turn the dog on its side.
Fase 4b: Place the palm of your hand in the middle of the dog's chest.
Fase 4c: Press for a count of "2," and release for a count of "1." Firm pressure is required. Repeat about 60 to 90 times per minute.
Fase 4d: Alternately (after 30 seconds), hold the dog's mouth and lips closed and blow firmly into its nostrils. Blow for 3 seconds, take a deep breath, and repeat until you feel resistance or see the chest rise. Try to repeat this 10 to 20 times per minute.
Fase 4e: After 1 minute, stop. Look at the chest for breathing movement, and feel for a heartbeat by placing your fingers about 2 inches behind the dog's elbow in the center of its chest.
Fase 4f: If the dog's heart is not beating, continue CPR. If the heart starts beating but the dog is still not breathing, return to Step 3.
Passaggio 5: Transport the dog immediately to the veterinarian. CPR or artificial respiration should be continued until the dog is breathing and its heart is beating without assistance.
Passaggio 6: If the dog's mouth or lips are burned (bright red), swab them gently with 3% hydrogen peroxide.
Passaggio 7: To conserve body heat, wrap the dog in a blanket or jacket.
Just like humans, dogs often have problems with their eyes due to dust, allergies, and other culprits. See the next page for tips on dealing with eye injuries.
Irritation of the eye in a dog can be caused by allergies, dust and dirt, lashes growing inward, fights, and more. It can result in a mild inflammation of the tissue around the eye (conjunctivitis) or severe damage to the cornea.
When examining a dog's eye, it is important to know that dogs have a third eyelid located in the corner of the eye nearest the nose. This third eyelid can completely cover the eyeball and sometimes gives the appearance that part of the eye is gone.
In addition to being a protective mechanism, the third eyelid can indicate that something is wrong with the eye. Se è sollevato e sembra rosso, l'occhio è infiammato. Do not try to touch or manipulate this eyelid.
Other indications that a dog's eye is irritated are squinting and rubbing and pawing at the eye. Your first priority is to prevent your pet from further injuring itself since this often causes more severe damage than the original irritation. Use the following tips to treat your dog's eye injuries.
Passaggio 1: DO NOT try to remove the object.
Passaggio 2: Restrain the dog if necessary.
Step 2a: Approach the dog slowly, speaking in a reassuring tone of voice.
Fase 3: Prevent self-injury to the eye.
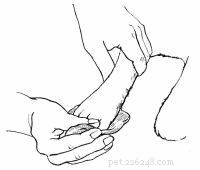
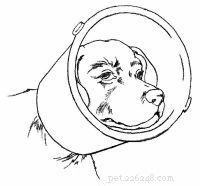
Fase 3a: Dewclaws (if present) should be bandaged on the front paw on the same side as the affected eye.
Fase 3b: For small dogs, cut a large piece of cardboard into an Elizabethan-type collar.

Fase 3c: For larger dogs, cut the bottom from a plastic bucket, fit the bucket over the dog's head, and hold it in place by tying it to the dog's collar.
Fase 4: Transport the dog immediately to the veterinarian.
The typical signs of a scratched or irritated eye include squinting; rubbing or pawing at the eyes; or thick discharge or redness in the eye.
Passaggio 1: Restrain the dog if necessary.
Fase 1a: Approach the dog slowly, speaking in a reassuring tone of voice.
Passaggio 2: Flush the dog's eye thoroughly with saline solution or plain water.
Fase 3: Prevent self-injury to the eye.
Fase 3a: Dewclaws (if present) should be bandaged on the front paw on the same side as the affected eye.
Fase 3b: For small dogs, cut a large piece of cardboard into an Elizabethan-type collar.
Fase 3c: For larger dogs, cut the bottom from a plastic bucket, fit the bucket over the dog's head, and hold it in place by tying it to the dog's collar.
Fase 4: Transport the dog immediately to the veterinarian.
A dog can be sensitive to extreme cold, especially its ears and the tip of its tail. If you suspect your pet is suffering from frostbite, take note of the first-aid tips on the next page.
When a dog is exposed to freezing temperatures for a long period of time, there is always the possibility of frostbite. The signs of frostbite include pain, pale skin in early stages, and red or black skin in advanced stages.
The areas most likely to be frostbitten are those that have little or no hair and the ears and tail tip, which have a limited blood supply. Occasionally, if damage from frostbite is severe, part of the tail or ear tips may actually fall off. Professional attention should be sought before this happens. To provide proper care to a dog suffering from frostbite, use the following tips.
Passaggio 1: Restrain the dog if necessary.
Fase 1a: Approach the dog slowly, speaking in a reassuring tone of voice.
Fase 1b: Slip a leash around the dog's neck, then place the leash around a fixed object. Pull the dog against this object and tie the leash so the dog cannot move its head.
Fase 1c: Muzzle the dog to protect yourself, if necessary.
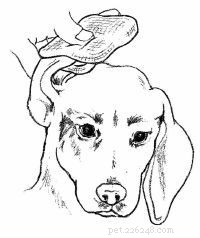
Passaggio 2: Riscalda l'area con asciugamani umidi. The water temperature should be warm but not hot (75 degrees Fahrenheit/24 degrees Celsius). DO NOT use ointment.
Fase 3: If the skin turns dark, transport the dog to the veterinarian as soon as possible.
Just as exposure to extreme cold can be harmful to your pet, so, too, can extreme heat. Check the next section to learn how to treat a dog that has heatstroke.
Heatstroke is caused by the inability of the body to maintain its normal temperature because of the environmental heat. It is often caused by keeping a dog in a locked car parked in the sun or by keeping it in any hot area without adequate ventilation.
The signs of heatstroke are excessive drooling, lack of coordination, rapid breathing, and a top of the head that is hot to the touch. Prompt treatment is urgent. Body temperatures often get as high as 107 degrees Fahrenheit/41.5 degrees Celsius, and without quick cooling, severe brain damage and death will occur.
Heatstroke can be prevented by making sure your dog has plenty of shade and ventilation. If you must take your dog driving with you, park in the shade and leave all the windows partially open.
Should heatstroke occur, use the following suggestions to help you provide your dog with the utmost care.
Passaggio 1: Remove the dog from the hot environment.
Passaggio 2: Immerse the dog in a cold water bath or continuously run a garden hose on its body; continue either treatment for at least 30 minutes.
Fase 3: Apply ice packs to the top of the head; keep them there while transporting the dog to the veterinarian.
Fase 4: Transport the dog to the veterinarian immediately after the above treatment.
Another pet injury that requires immediate professional treatment is hypothermia. Check the next page for tips on what to do if you suspect your pet is suffering from this condition.
Exposure to either cold water or freezing temperatures can cause hypothermia, or subnormal body temperatures. A dog's survival will depend on how low its body temperature drops.
A dog's normal body temperature is 100 to 101 degrees Fahrenheit/38 degrees Celsius. If it drops below 90 degrees Fahrenheit/32 degrees Celsius for any length of time, normal bodily functions will be severely impaired.
The signs of hypothermia include depression, subnormal body temperature, and coma. This condition always requires veterinary attention as soon as possible. Use the following tips to help you provide proper care to a dog suffering from hypothermia.
Passaggio 1: Warm the dog.
Fase 1a: Place a hot water bottle (100 degrees Fahrenheit/37 degrees Celsius) against the dog's abdomen. Wrap the bottle in a cloth to prevent burns. Wrap the dog in a blanket or jacket.
Passaggio 2: Transport the dog immediately to the veterinarian.
Just like humans, dogs can be allergic to insect bites, so it's important to know the warning signs. Learn more about treating insect stings on the next page.
While most insect bites to a dogwill be uneventful, if your pet has been stung by a bee, wasp, yellow jacket, or hornet, the area will quickly become swollen and somewhat painful. A possible allergic reaction to the venom deposited by the insect is the most serious problem.
The signs of an insect bite include swelling, pain in the muscles and affected area, vomiting, weakness, fever, and shock. The signs of shock are pale or white gums, a rapid heartbeat, or rapid breathing. Below are helpful suggestions on what to do if your pet has been stung by a pest.
Passaggio 1: Restrain the dog if necessary.
Fase 1a: Approach the dog slowly, speaking in a reassuring tone of voice.
Fase 1b: Muzzle the dog to protect yourself, if necessary.
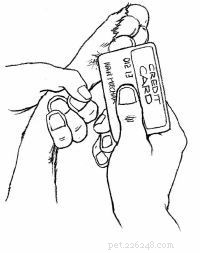
Passaggio 2: DO NOT pinch the area. If the dog has been stung by a bee, scrape the stinger off immediately with a credit card or dull knife. Other insects do not leave the stinger in the skin.
Fase 3: If the affected area is swollen and hot, apply cortisone cream and hold ice on the dog's skin for a short time.
Fase 4: Administer antihistamine such as diphenhydramine (Benadryl) orally at a dose of 1mg per pound of body weight (e.g., a 25-pound dog would get 25mg pill or capsule).
Passaggio 5: If the dog experiences any difficulty breathing or if its face seems swollen, transport the dog immediately to the veterinarian.
Did you know your house is filled with products that are poisonous to your beloved pet? Check the next page to find out what they are and what to do if your dog gets a hold of one of these harmful substances.
Dogs are curious creatures and like to investigate, which leads to many accidental poisonings each year. Often a dog will find an open can or bottle of some chemical and, accidentally or on purpose, spill it. Naturally the chemical gets on its fur and paws, and while licking the area clean, it swallows the possibly toxic substance. It is your responsibility as a pet owner to keep all potentially toxic products tightly closed and out of your dog's reach.
Some of the signs of a possible poisoning include excessive drooling, vomiting, diarrhea, abdominal pain, twitching, nervousness, convulsions, coma, and a chemical odor on the body. Here's what you can do if your dog is poisoned:
Passaggio 1: If the dog is comatose or convulsing, wrap it in a blanket and transport your pet immediately to the veterinarian with the suspect poison container, plant, or leaf.
Passaggio 2: If the dog has a chemical odor on its skin, wash the entire dog with mild soap until the odor is gone. If the poison was licked or ingested, flushing the dog's mouth with clean water may also help in decontamination.
Fase 3: If the dog has not already vomited and the poison is not a caustic or petroleum product (see lists below), induce vomiting by giving 1 tablespoon of 3% hydrogen peroxide per 20 pounds every 10 minutes until vomiting starts. If no vomiting occurs within 30 minutes, transport the dog immediately to the veterinarian with the suspected poison container.
Fase 4: Call the Pet Poison Control hotline for further instructions at 888-426-4435. (Questo servizio è a pagamento.)
Caustics include battery acid, corn and callous remover, dishwashing detergent, drain cleaner, grease remover, lye, and oven cleaner. I prodotti petroliferi includono solventi per vernici, cera per pavimenti e soluzioni per il lavaggio a secco.
You might be surprised by the number of household items that are poisonous to your dog. Some of the most common are alcoholic beverages, ammonia, antifreeze, bleach, chocolate (baking chocolate is the worst), detergents, disinfectants, dry-cleaning solution, fertilizer, furniture polish, gasoline, glue, grapes and raisins, human medications, mothballs, mouse and rat poison, onions, oven cleaners, paint thinner and remover, shoe polish, silver polish, and toilet bowl cleaner.
In addition, some household plants are toxic to your pet, including aloe vera, amaryllis, avocado, azalea, bird of paradise, calla lily, castor bean, corn plant, cyclamen, daffodil, day lily, dieffenbachia, Easter lily, elephant ears, English ivy, gladiolus, holly, hyacinth, hydrangea, iris, kalanchoe, macadamia nut, mistletoe, narcissus, onion, philodendron, poinsettia, rhododendron, tomato plant, tulip, yew, and yucca.
(This is only a partial list. For a more complete listing, refer to the ASPCA Animal Poison Center at www.aspca.org.)
Dogs can also become poisoned from smoke or carbon monoxide. Check the next section for tips on what to do in this first-aid emergency.

Fires are another possible threat to dogs. Do not risk your own life to save your dog. Leave that task to the firefighters or those trained in rescue.
The signs of smoke or carbon monoxide inhalation include depression, lack of coordination, heavy panting, deep red gums, and possible convulsions. Also watch for signs of shock, which are pale or white gums, a rapid heartbeat, or rapid breathing.
If suspect your pet is suffering from smoke or carbon monoxide inhalation, use the following tips to provide the dog with proper care.
Passaggio 1: Remove the dog from the area and into fresh air immediately.
Passaggio 2: Flush the dog's eyes thoroughly with saline solution or clean water.
Fase 3: Transport the dog immediately to the veterinarian.
Passaggio 1: Remove the dog from the area and into fresh air immediately.
Passaggio 2: If the dog is not breathing, feel for a heartbeat by placing your fingers about 2 inches behind the dog's elbow in the middle of its chest.
Fase 3: If the heart is not beating, proceed to Step 4. If it is, perform artificial respiration.
Fase 3a: Turn the dog on its side.
Fase 3b: Hold the dog's mouth and lips closed and blow firmly into its nostrils. Administer 1 breath every 3 to 5 seconds. Take a deep breath, and repeat until you feel resistance or see the dog's chest rise.
Fase 3c: After 1 minute, stop. Watch the chest for movement to indicate the dog is breathing on its own.
Step 3d: If the dog is not breathing, continue artificial respiration.
Fase 4: Se il cuore non batte, eseguire la rianimazione cardiopolmonare (RCP).
Fase 4a: Turn the dog on its back.
Fase 4b: Kneel down at the head of the dog.
Fase 4c: Clasp your hands over the dog's chest with your palms resting on either side of its chest.
Fase 4d: Compress your palms on the chest firmly for a count of "2," and release for a count of "1." Moderate pressure is required. Repeat about 60 to 90 times per minute.
Fase 4e: Alternately (after 30 seconds), hold the dog's mouth and lips closed and blow firmly into its nostrils. Blow for 3 seconds, take a deep breath, and repeat until you feel resistance or see the dog's chest rise. Try to repeat this 10 to 20 times per minute. As a general rule, use a CPR ratio of about 5 heart compressions to 1 breath of air.
Fase 4f: After 1 minute, stop. Look at the chest for breathing movement, and feel for a heartbeat by placing your fingers about 2 inches behind the dog's elbow in the center of its chest.
Fase 4g: If the dog's heart is not beating, continue CPR. If the heart starts beating, but the dog is still not breathing, return to Step 3.
Fase 4a: Turn the dog on its side.
Fase 4b: Place the palm of your hand in the middle of the dog's chest.
Fase 4c: Press for a count of "2," and release for a count of "1." Firm pressure is required. Repeat about 60 to 90 times per minute.
Fase 4d: Alternately (after 30 seconds), hold the dog's mouth and lips closed and blow firmly into its nostrils. Blow for 3 seconds, take a deep breath, and repeat until you feel resistance or see the chest rise. Try to repeat this 10 to 20 times per minute.
Fase 4e: After 1 minute, stop. Look at the chest for breathing movement, and feel for a heartbeat by placing your fingers about 2 inches behind the dog's elbow in the center of its chest.
Fase 4f: If the dog's heart is not beating, continue CPR. If the heart starts beating but the dog is still not breathing, return to Step 3.
Passaggio 5: Transport the dog immediately to the veterinarian. CPR or artificial respiration should be continued on the way to the veterinarian or until the dog is breathing and its heart is beating without assistance.
A puncture wound can be quite painful and traumatic for a dog. In the next section, we'll learn how to treat this type of injury.
A puncture wound on a dog may be difficult to see because it is often covered with hair. Since the most common location for a puncture wound is the bottom of the paw, the first sign may be a limp. Slightly blood-tinged fur is a common sign of a puncture wound on other parts of the body.
If you suspect your dog has a puncture wound, be sure to watch for signs of shock, which include pale or white gums, a rapid heartbeat, or rapid breathing. The following tips will help you treat your wounded pet.
Passaggio 1: Restrain the dog if necessary, taking care not to touch the object.
Fase 1a: Approach the dog slowly, speaking in a reassuring tone of voice.
Fase 1b: Slip a leash around the dog's neck, then place the leash around a fixed object. Pull the dog against this object and tie the leash so the dog cannot move its head.
Fase 1c: Muzzle the dog to protect yourself if necessary.
Passaggio 2: DO NOT attempt to remove the object.
Fase 3: Place clean cloths, sterile dressings, or sanitary napkins around the point of entry.
Fase 4: Bandage tightly around the point of entry.
Passaggio 5: Transport the dog immediately to the veterinarian.

Passaggio 1: Restrain the dog if necessary.
Fase 1a: Approach the dog slowly, speaking in a reassuring tone of voice.
Passaggio 2: If the wound is in the chest and a "sucking" noise is heard, bandage tightly enough to seal the wound, and transport the dog immediately to the veterinarian.
Fase 3: If the wound is not in the chest, clip the hair around the wound.

Fase 4: Examine the wound carefully for foreign objects. If present, remove the object with tweezers or needle-nose pliers.
Passaggio 5: Flush the wound thoroughly with clean water. Avoid home antiseptics, which may cause pain when applied.
Passaggio 6: DO NOT bandage. Allow the wound to drain unless there is excessive bleeding. If the wound does bleed excessively, follow these steps:
Step 6a: Cover wound with clean cloth, sterile dressing, or sanitary napkin.
Step 6b: Place your hand over the dressing and press firmly.
Step 6c: Keep pressure on the dressing to stop the bleeding.
Step 6d: If blood soaks through the dressing, DO NOT remove it. Apply more dressing and continue to apply pressure until the bleeding stops.
Passaggio 7: If the bleeding does not stop within 5 minutes, continue to apply pressure on the wound while transporting the dog to the veterinarian.
Knowing how to identify the signs of shock and how to treat it will help you in many pet first-aid situations. In the next section, learn about proper care for dogs experiencing shock.
Shock is extremely serious; it is the No. 1 killer in accidents. Shock is a reaction to heavy internal or external bleeding or any serious injury that "scares" the body; ad esempio, una grande ferita o un'amputazione con una forte perdita di sangue. The body tries to compensate for the loss by speeding up the heart rate to keep the blood pressure from falling. At the same time the blood vessels that supply the outside of the body narrow. This is to conserve blood so vital organs of the body can continue to receive their normal blood supply.
Tuttavia, se c'è una forte perdita di sangue o altre gravi lesioni, il corpo reagisce in modo eccessivo e provoca un ristagno di sangue negli organi interni. This can cause death due to a drop in external blood pressure and possible oxygen starvation of the brain.
The signs of shock include pale or white gums, a rapid faint heartbeat, rapid breathing, or below-normal body temperature (feels cold). If your dog is in shock, use the following tips to provide proper first aid.
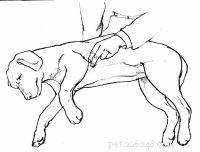
Passaggio 1: Examine the dog for shock.
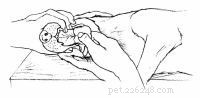
Fase 1a: Examine the gums by gently lifting the dog's upper lip so the gum is visible. Pale or white gums indicate the dog is almost certainly in shock and may have serious internal injuries and/or bleeding. If the gums are pink, the dog is probably not in shock.
Fase 1b: Determine the dog's heartbeat. Place your fingers firmly on the dog about 2 inches behind the dog's elbow in the center of its chest. Count the number of beats in 10 seconds and multiply by 6. If the dog is in shock its heartbeat may be more than 150 beats per minute.
Passaggio 2: Place the dog on its side with its head extended.
Fase 3: Gently pull out the dog's tongue to keep the airway open.
Fase 4: Elevate the dog's hindquarters slightly by placing them on a pillow or folded towels.
Passaggio 5: Stop visible bleeding immediately. If blood is spurting and the wound is on the leg or tail, proceed to Step 6.
Step 5a: Cover the wound with a clean cloth, sterile dressing, or sanitary napkin.
Step 5b: Place your hand over the dressing and press firmly.
Step 5c: Keep pressure on the dressing to stop bleeding. If blood soaks through the dressing, DO NOT remove it. Apply more dressing and continue to apply pressure until the bleeding stops. If bleeding does not stop within 5 minutes, continue to apply pressure on the wound while transporting the dog to the veterinarian.
Step 5d: Wrap torn rags or other soft material around the dressing and tie or tape it just tightly enough to keep the bandage on. Start below the wound and wrap upward.
Passaggio 6: If bleeding does not stop within 5 minutes, transport the dog immediately to the veterinarian.
Passaggio 7: To conserve body heat, wrap the dog in a blanket or jacket.
A dog's encounter with a skunk is not only smelly, but it can also be dangerous, since skunks are a major carrier of rabies. Turn to the next page to find out what to do if your pet has been sprayed by a skunk.
Skunks are one of the major carriers of rabies in North America. Therefore, a dog's encounter with a skunk should be treated as more than just a stinky situation. Use the following suggestions to provide proper care for your pet.
Passaggio 1: Restrain the dog if necessary.
Fase 1a: Approach the dog slowly, speaking in a reassuring tone of voice.
Fase 1b: Slip a leash around the dog's neck, then place the leash around a fixed object. Pull the dog against this object and tie the leash so the dog cannot move its head.
Fase 1c: Muzzle the dog to protect yourself.
Passaggio 2: Flush the dog's eyes with fresh water.
Fase 3: Remove and destroy leather collars or harnesses.
Fase 4: Bathe the dog thoroughly with soap or shampoo and water. Repeat several times.

Passaggio 5: Applicare abbondantemente il succo di pomodoro semplice. After several minutes, bathe the dog again with soap or shampoo and water. Il tempo alla fine rimuoverà l'odore. Skunk odor neutralizers are available.
Passaggio 6: Se la puzzola viene distrutta, portala dal veterinario per un esame della rabbia. DO NOT touch the skunk with your bare hands.
Passaggio 7: If the dog is not currently vaccinated for rabies, contact the veterinarian.
An encounter with a snake can also create a pet emergency situation. See the next section for how to treat snakebites.
I morsi di serpente velenosi sono rari in Nord America. Most snakes are nonpoisonous, and neither poisonous nor nonpoisonous snakes will attack a dog unless provoked. But many pets are curious, and bites will occur.
If you live in or visit a snake-inhabited area, you can expect problems if you let your dog run loose. Be prepared by reading the following tips for treating snakebites.
The signs of a poisonous snakebite are two fang marks, pain, swelling, vomiting, difficulty breathing, and possible paralysis and convulsions. Be sure to watch for sings of shock, which include pale or white gums, a rapid heartbeat, or rapid breathing.
Il trattamento deve iniziare il prima possibile dopo il morso. Se il serpente è stato ucciso, portalo dal veterinario per l'identificazione. Otherwise, try to remember identifying marks.
Passaggio 1: Restrain the dog if necessary.
Fase 1a: Approach the dog slowly, speaking in a reassuring tone of voice.
Fase 1b: Slip a leash around the dog's neck, then place the leash around a fixed object. Pull the dog against this object and tie the leash so the dog cannot move its head.
Fase 1c: Muzzle the dog to protect yourself if necessary.
Passaggio 2: Clip the hair from the bite area.
Fase 3: Flush thoroughly by pouring 3% hydrogen peroxide directly on the bite.
Fase 4: Transport the dog immediately to the veterinarian.
The signs of a nonpoisonous snakebite are a U-shape bite and pain in the bite area. If you are not sure the snake is nonpoisonous, treat as poisonous. See above.
Passaggio 1: Restrain the dog if necessary.
Fase 1a: Approach the dog slowly, speaking in a reassuring tone of voice.
Fase 1b: Slip a leash around the dog's neck, then place the leash around a fixed object. Pull the dog against this object and tie the leash so the dog cannot move its head.
Fase 1c: Muzzle the dog to protect yourself, if necessary.
Passaggio 2: Clip the hair from the bite area.
Fase 3: Flush thoroughly by pouring 3% hydrogen peroxide directly on the bite.
Various injuries may cause unconsciousness in a dog. Turn to the next section for tips on what to do in this emergency situation.
Your first priority when dealing with an unconscious dog is to get the heart beating and the dog breathing. Also be sure to watch for signs of shock, which include pale or white gums, a rapid heartbeat, or rapid breathing. Use the following tips to provide proper treatment to a dog that has lost consciousness.
Passaggio 1: If you suspect choking, clear the dog's airway. If the dog is not choking, proceed to
Step 2.
Fase 1a: Open the dog's mouth carefully by grasping the upper jaw with one hand over the muzzle.
Fase 1b: Press the dog's lips over the upper teeth by pressing your thumb on one side and your fingers on the other so that the lips are between the dog's teeth and your fingers. Apply firm pressure to force the mouth open.
Fase 1c: If you can see the object, try to remove it with your fingers.
Fase 1d: If you cannot remove the object and the dog is small enough, pick it up by grasping its back legs; turn it upside down and shake vigorously. Slapping its back while shaking may help to dislodge the object.
Step 1e: If you cannot remove the object and the dog is too large to pick up, place the dog on its side on the floor. Place your hand just behind the rib cage and press down and slightly forward quickly and firmly. Release. Repeat rapidly several times until the object is expelled.
Step 1f: If you cannot dislodge the object, transport the dog immediately to the veterinarian.
Passaggio 2: If the dog is breathing, check for shock. If the dog is not breathing, proceed to Step 3.
Step 2a: Examine the gums by gently lifting the upper lip so the gum is visible. Pale or white gums indicate the dog is almost certainly in shock and may have serious internal injuries and/or bleeding. If the gums are pink, the dog is probably not in shock.
Step 2b: Determine the heartbeat. Place fingers firmly on the dog about 2 inches behind the dog's elbow in the center of its chest. Count the number of beats in 10 seconds and multiply by 6. If the dog is in shock its heartbeat may be more than 150 beats per minute.
Step 2c: Place the dog on its side with its head extended. Gently pull out the dog's tongue to keep the airway open.
Step 2d: Elevate the dog's hindquarters slightly by placing them on a pillow or folded towels. To conserve body heat, wrap the dog in a blanket or jacket.
Step 2e: Transport the dog immediately to the veterinarian.
Fase 3: Feel for a heartbeat by placing your fingers about 2 inches behind the dog's elbow in the middle of its chest.

Fase 4: If the dog's heart is not beating, proceed to Step 5. If it is, perform artificial respiration.
Fase 4a: Turn the dog on its side.
Fase 4b: Hold the dog's mouth and lips closed and blow firmly into its nostrils. Administer 1 breath every 3 to 5 seconds. Take a deep breath, and repeat until you feel resistance or see the dog's chest rise.
Fase 4c: After 10 seconds, stop. Watch the chest for movement to indicate the dog is breathing on its own.
Fase 4d: If the dog is not breathing, continue artificial respiration.
Passaggio 5: If the heart is not beating, perform CPR.
Step 5a: Turn the dog on its back.
Step 5b: Kneel down at the head of the dog.
Step 5c: Clasp your hands over the dog's chest with your palms resting on either side of its chest.
Step 5d: Compress your palms on the chest firmly for a count of "2," and release for a count of "1." Moderate pressure is required. Repeat about 60 to 90 times per minute.
Step 5e: Alternately (after 30 seconds), hold the dog's mouth and lips closed and blow firmly into its nostrils. Blow for 3 seconds, take a deep breath, and repeat until you feel resistance or see the dog's chest rise. Try to repeat this 10 to 20 times per minute. As a general rule, use a CPR ratio of about 5 heart compressions to 1 breath of air.
Step 5f: After 1 minute, stop. Look at the chest for breathing movement, and feel for a heartbeat by placing your fingers about 2 inches behind the dog's elbow in the center of its chest.
Step 5g: If the dog's heart is not beating, continue CPR. If the heart starts beating, but the dog is still not breathing, return to Step 4.
Step 5a: Turn the dog on its side.
Step 5b: Place the palm of your hand in the middle of the dog's chest.
Step 5c: Press for a count of "2," and release for a count of "1." Firm pressure is required. Repeat about 60 to 90 times per minute.
Step 5d: Alternately (after 30 seconds), hold the dog's mouth and lips closed and blow firmly into its nostrils. Blow for 3 seconds, take a deep breath, and repeat until you feel resistance or see the chest rise. Try to repeat this 10 to 20 times per minute.
Step 5e: After 1 minute, stop. Look at the chest for breathing movement, and feel for a heartbeat by placing your fingers about 2 inches behind the dog's elbow in the center of its chest.
Step 5f: If the dog's heart is not beating, continue CPR. If the heart starts beating but the dog is still not breathing, return to Step 4.
Passaggio 6: Transport the dog immediately to the veterinarian. CPR or artificial respiration should be continued on the way to the veterinarian or until the dog is breathing and its heart is beating without assistance.
Like diarrhea, vomiting is not necessarily a serious problem unless a dog becomes dehydrated. Check the next page for tips on what potential problems to look for.
Vomiting is one of the most commonly encountered problems in veterinary medicine. It is nature's way of permitting the dog to rid its stomach of an irritating substance such as spoiled food.
But not all vomiting is due to simple irritation. More serious causes are viral infections or diseases of the liver, pancreas, or kidney. It is important to seek professional help if there are signs of bleeding or if the dog is depressed and still vomiting after initial efforts at control have failed. Here are some tips for treating a vomiting dog:
Passaggio 1: Remove all food and water for at least 12 to 24 hours.
Passaggio 2: If vomiting contains blood or is frequent, contact the veterinarian immediately. If not, proceed to Step 3.
Fase 3: After 12 to 24 hours of no vomiting, introduce water gradually at 1 to 2 ounces at a time. If no vomiting occurs, offer a bland diet of boiled skinless chicken and rice (50:50 mixture). If this is held down, transition to regular diet over the next 2 days by mixing an increasing quantity of regular dog food with bland diet.
Fase 4: Pepto-Bismol can be safely used for dogs. Call the veterinarian for recommended dose.
A dog giving birth to puppies can be quite an amazing experience -- for both the dog and its owner. Turn to the next page to learn how to be prepared to help a dog if problems occur during the birth process.
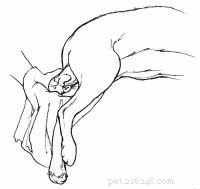
A dog's normal length of pregnancy (gestation period) is 61 to 63 days. However, delivery 1 or 2 days earlier or later is not unusual and presents no cause for alarm as long as the general health of the dog is good.
In preparation for whelping, the dog will make a nest with newspapers and rags if they are available. If they are not, she may dig into the carpeting with her front paws, almost as if she were digging a hole. This is termed "nest building" and is a fairly consistent sign that delivery will follow soon, usually within 2 to 3 days. To make your pet feel comfortable about delivering (and to save your carpet!) provide a whelping box with plenty of newspapers and rags.
At about the same time the nest building occurs, you should also notice an enlargement of the breasts with milk production. Another fairly consistent method of determining when the dog will deliver is to take her temperature each day. Approximately 24 hours before delivery, her temperature will drop about 2 degrees Fahrenheit/1 degree Celsius.
When she is getting close to labor, a mucous discharge appears at the vulva followed by a greenish discharge. At no time should there be a brown or foul-smelling discharge. If this is present, contact your veterinarian immediately.
The onset of labor will make the dog somewhat restless, but it is not until the second stage of labor that she will actually lie down and have abdominal contractions. Once the second stage of labor begins, delivery should begin within 3 hours. If no pups are delivered by that time, professional help should be obtained.
A puppy may be born in one of three ways. The most common presentation is head and feet first. The second most common is rear legs and tail first, not to be confused with a true breech birth. In a true breech only the rump is presented, with the rear legs folded under the body of the puppy. In a small bitch, this type of presentation can cause problems and should be watched for carefully.
Complications may arise during the birthing process that you can handle quite easily by using the tips below.
Passaggio 1: Grasp the puppy with a clean towel.
Passaggio 2: Applying steady traction, gently pull the puppy at a slight downward angle. Continue pulling gently and steadily until the pup is delivered.
Fase 3: If you are unable to remove the puppy, contact the veterinarian immediately.
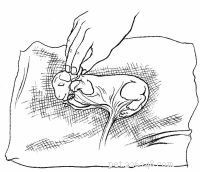
Passaggio 1: Put the pup, covered in the fetal membrane, on a clean towel.
Passaggio 2: Peel the membrane off its face immediately.
Fase 3: Continue to pull the membrane from its body. The membrane will collect around the umbilical cord. DO NOT pull on the umbilical cord.
Fase 4: Wipe any fluid off the nostrils and mouth. Rub the puppy's body vigorously with a towel to stimulate breathing.
Passaggio 5: If there is heavy mucus in the mouth and nose, clean out what you can with your finger.
Passaggio 6: If the puppy is still having trouble breathing:
Step 6a: Place the puppy in a towel on the palm of your hand.
Step 6b: Cradle its head by closing your thumb toward your fingers.
Step 6c: Using your other hand to secure the puppy, lift your hands to head level and swing firmly down toward the floor. Repeat several times.
Step 6d: Vigorously rub the puppy again with the towel.
Step 6e: Stop when the puppy is actively moving and crying.
Passaggio 7: Tie a thread around the umbilical cord about 1 inch above the puppy's abdomen. Leaving the tied portion attached to the puppy, cut off the rest of the umbilical cord and fetal membrane.
Step 8: Place the puppy with its mother. She will take care of the rest. If she does not take care of the puppies, or if any other problem develops, contact the veterinarian as soon as possible.
Seeing a dog hurt or in distress can be such a helpless feeling. By learning the tips outlined in this article, you can arm yourself with dozens of first-aid techniques that may end up saving the life of your beloved pet.
Pubblicazioni internazionali, Ltd.
